What you need:
36 x 6mm round beads
24 x 4mm round beads, color 1
36 x 4mm round beads, color 2
48 x 3mm round beads
264 x seed beads size 10-11 (surely you don’t have to count them ;) )
2 x Beading needle (size 10 should be enough)
Your favourite beading thread (for this project a fishing line 0,20 mm has been used)
This tutorial ;)
The finished piece is 4cm (1,57") wide in diameter
1. Cut a comfortable length of the beading thread, thread the needles on both ends
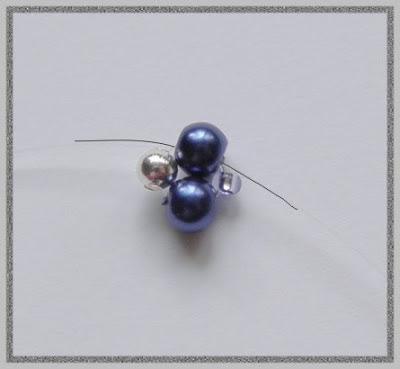
2. Pick up 1 x seed bead, 1 x 4mm bead (color 1), 1 x 3mm bead, 1 x 4mm bead
and cross the thread in the last bead
3. Pick up 1 x 3mm bead with one needle, 1 x seed bead and 1 x 4mm bead with the other needle
4. Cross the thread in 4mm bead added in step 3
5. Repeat steps 3-4 until you have added 12 4mm beads in total
6. Pick up 1 x 3mm bead with one needle, 1 x seed bead with the other needle
and cross the thread in the first 4mm bead added in step 2 to connect both sides altogether
7. This is how your beadwork should look like at the end of this step:
8. Pass one needle through the seed bead. Do not cut the other end of the thread as
it will be useful later (surely you can get rid of the other needle for now ;) )
9. Pick up 1 x seed bead and pass the needle through the nearest seed bead added in step 3
10. Repeat step 9 until you have added 12 seed beads in total. Do not step up, leave the thread
coming out from a seed bead added in step 3
11. Pick up 1 x 4mm bead, 1 x 3mm bead, 1 x 4mm bead and pass the needle again through
the same seed bead it was coming out
12. Pass the needle through the next two seed beads
13. Pick up 1 x 4mm bead, 1 x 3mm bead and pass the needle through the nearest 4mm bead
added in a previous step
14. Pass the needle through the same seed bead the thread was coming out at the beginning of
previous step
15. Pass the needle though the next two seed beads
16. Repeat steps 13-15 until you have added 12 4mm beads in total.
17. Make sure you have repeated step 15 after adding the last bead, so your thread is coming
out from the seed bead added in step 3. Pass the needle through the first 4mm bead added
in step 13, pick up 1 x 3mm bead and pass the needle through the last 4mm bead added, to
join both sides altogether
18. Pass the needle through the same seed bead the thread was coming out at the beginning
of step 17
19. Pass the needle through one 4mm bead and one 3mm bead
20. Pick up 1 x 3mm bead and pass the needle through the nearest 3mm bead added in step
13. Repeat until you have added 12 3mm beads in total. Do not step up, leave the thread
coming out from the 3mm bead added in step 13
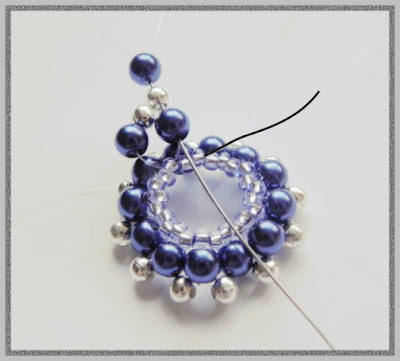
21. This is how your beadwork should look like at this stage:
The next part will be available as soon as possible. So stay here. ;)
--------------------------------------------------------------------------------
The printer friendly pdf file with the whole instruction is available here on Craftsy and Etsy.
Disclaimer: Please do not sell the items you made from the free tutorials. If you want to sell the items, please purchase the pdf files I offer on Craftsy and Etsy - that gives you the right for selling your creations. Thank you.


odwazyłam się :) uzbierałam co i ile trzeba i w koncu! uplotłam tą przecudną oponkę :) bardzo, ale to bardzo pięknie (kolejny raz) dziękuję za ten tutorial- z nim się udało :) serdecznie pozdrawiam i życzę siły i zdrowia
ReplyDeleteBardzo się cieszę, że skorzystałaś ze wzoru i że tutorial okazał się wystarczająco czytelny - dla mnie to najlepsza nagroda, że moja praca związana z jego przygotowaniem nie poszła na marne. Dziękuję za życzenia oraz ściskam i pozdrawiam serdecznie w Nowym Roku :)
Deletemolto bello brava!!
ReplyDelete