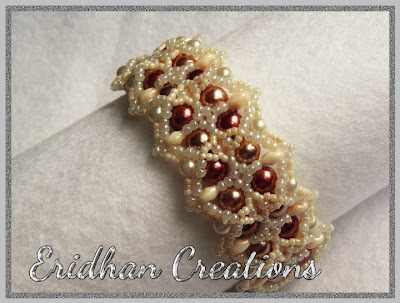
Finally! I admit it has taken lots of time for me to force myself to some working again. But now, as the spring is already here and the flowers are in bloom, the tutorial for a beaded flower, as I promised in
this post, is ready and available to all of you. So enjoy. :)
You will need:
The finished piece measures 4,5cm (1,77") in diameter.
1. Cut a comfortable length of thread and string: 1 x 6mm round bead, 1 x 8/o seed bead, 1 x 6mm round bead, 1 x 8/o seed bead, 1 x 6mm round bead, 1 x 8/o seed bead and cross the thread in the last bead strung.
2. Pick up 1 x 6mm bead, 1 x 8/o bead, 1 x 6mm bead with the left thread, pick up 1 x 6mm bead with the right thread, pick up 1 x 8/o seed bead and cross both threads in this bead. Repeat four more times.
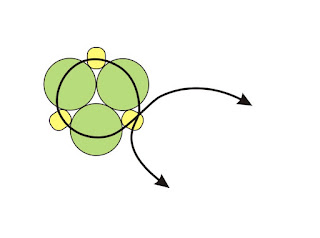
3. Pick up 1 x 6mm bead, 1 x 8/o bead, 1 x 6mm bead with the left thread, pick up 1 x 6mm bead with the right thread and cross both threads in the nearest 8/o seed bead strung in step 1 as shown in the picture. As you will continue with one thread only you can make a knot to keep better tension.
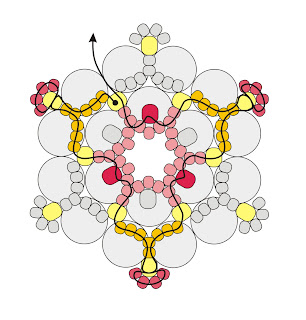
4. Make sure that your thread is exiting from the 8/o bead and is directed towards the center of your beadwork. Pick up 7 x 11/o seed beads and pass through the next 8/o bead as shown in the picture. Then pass through the 6mm bead, 8/o bead, another 6mm bead and 8/o bead. Repeat the entire step two more times and at the end pass through the two first 11/o beads as it is shown in the picture.
5. Pick up 3 x 11/o seed beads and pass through the two 11/o beads on the other side (you are changing the direction now). Then pass through the 8/o bead, 6mm bead, 8/o bead, 6mm bead, another 8/o bead and two nearest 11/o beads as shown in the picture. Repeat the entire step two more times. At the end pass through the two additional 11/o beads so your thread is exiting from the 4th (middle one) 11/o bead.
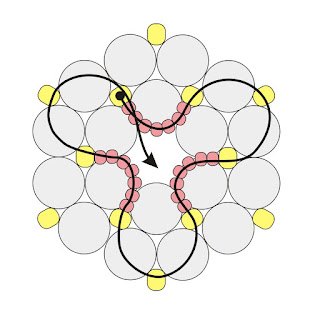
6. Pick up 2 x 11/o beads and pass through the middle 11/o bead added in the previous step. Repeat five more times, adding 12 x 11/o beads in total in the center of your beadwork (left picture).
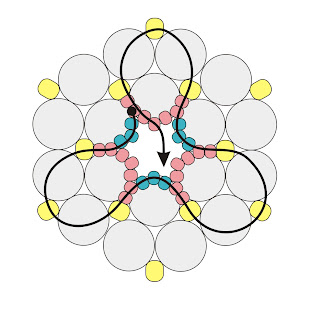
7. Pick up 1 x 8mm round bead and pass through the beads on the opposite side as shown in the middle picture. Push the just added bead gently inside the circle of the 11/o beads - the 8mm bead should be inside the 6mm beads, partially covered by the 11/o beads.
8. Pick up 1 x 15/o seed bead and pass through the next two 11/o beads as shown in the picture on the right. Repeat five more times, adding 6 x 15/o beads in total.
9. Pass through the beads so your thread is exiting from one of the 8/o beads and is directed towards the outer edge of your beadwork as it is shown in the picture.
10. Pick up 5 x 11/o beads and pass through the nearest 8/o bead.
11. Pick up 4 x 11/o beads and pass again through the same 8/o bead, creating a small loop above it.
12. Pass through the two nearest 11/o beads added in step 10.
13. Pick up 3 x 11/o beads and pass through the nearest 8/o bead as shown in the picture.
14. Pass through the three nearest 11/o beads added in steps 4-5.
15. Pick up 1 x 8/o seed bead, skip one 11/o bead and pass through the next three 11/o beads and the 8/o bead as shown in the picture.
16. Repeat steps 10-15 two more times.
17. Change the direction and repeat steps 10-15 three more times.
18. Your thread should be exiting from one of the 8/o beads. Pass through the nearest three 11/o beads added in the previous round as shown in the picture.
19. Pick up 1 x 11/o bead and pass through the next two 11/o beads.
20. Pick up 3 x 11/o beads and pass through the 8/o bead added in the previous round.
21. Pick up 3 x 11/o beads and pass through the two 11/o beads as shown in the picture, the 11/o bead added in step 19 and the next three 11/o beads.
22. Pick up 1 x 8/o bead and pass through the next three 11/o beads.
23. Repeat steps 19-22 five more times. At the end pass through the first 11/o bead added in this round.
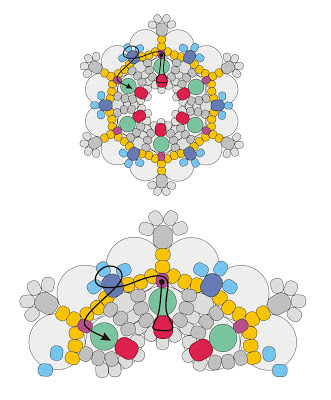
24. Pick up 1 x 4mm round bead and pass through the 8/o bead on the opposite side (close to the center of your beadwork). Pass again through the just added 4mm bead, the 11/o bead your thread was exiting at the beginning of this step, and then through the next three 11/o beads and the 8/o bead as shown in the picture.
25. Pick up 3 x 11/o beads and pass again through the same 8/o bead. Then pass through the next four 11/o beads as shown in the picture.
26. Repeat steps 24-25 five more times. At the end your thread should be exiting from one of the 8/o beads added in the previous round (dark blue beads in the picture).
27. Pass through the nearest 11/o bead which is the part of the loop created in the previous round.
28. Pick up 5 x 11/o beads and pass through the two 11/o beads from the loop above 8/o bead on the outer edge of your beadwork as it is shown in the picture.
29. Pick up 1 x 11/o bead and pass through the other two 11/o beads from the loop.
30. Pick up 5 x 11/o beads and pass through the 11/o bead (closest to the hole of the 8/o bead) as shown in the picture, then pass through the 8/o bead.
31. Repeat steps 27-30 five more times.
32. End the thread, make and secure the knots and enjoy your new beaded flower.
CONGRATULATIONS! :)
This pattern works great as a pendant, a brooch, a part of a necklace or a bracelet - how you will use it, it is only up to your imagination.
And one more thing for the end... I hope you enjoyed making this beaded flower and the tutorial was helpful for you. I will be happy to receive some feedback, and if you have any suggestions what should be changed in this tutorial, feel free to contact me. If you are going to show this piece of jewelry on your blog or any other website, please give me a credit for being the author of this pattern.
Happy beading!
Author: Justyna Szlęzak, Eridhan Creations
eridhan.blogspot.com
Unauthorized copying and/ or commercial use prohibited
Copyright by Justyna Szlęzak 2013
--------------------------------------------------------------------------------------------------
The printer friendly pdf file with the whole instruction is available
here on Etsy .
Disclaimer: Please do not sell the items you made from the free tutorials. If you want to sell the items, please purchase the pdf files I offer on Craftsy and Etsy - that gives you the right for selling your creations. Thank you.


