Wednesday, September 25, 2013

Flower Stud Earrings - free pattern

I have been away for a while, but now I'm back! I hope you weren't missing me too much though. ;)

As I promised in this post, I have finally prepared the tutorial for the flower stud earrings, like these below:


flower stud earrings free pattern


But first I want to say thanks to all of you, for your encouraging comments, for your e-mails, for every good word I got from you. I returned with no good news at all though, but don't worry, even though I decided to not continue the treatment - I just can't agree for the next chemotherapy, because I know that it will kill me faster than cancer - I feel great! I am an incurable optimist and I won't lose my positive attitude too soon. Can't waste the rest of my life, after all, and spend it on waiting for death. There are thousands of better things to do! ;)

Stay happy, my friends. :)


And now I'm happy to share the pattern here with you. :)

You will need:

76 x 11/o seed beads
120 x 15/o seed beads
24 x 11/o cylinder beads
2 x 6mm round beads
2 x flat or cup ear studs
beading thread
beading needle (size 12)
jewelry glue

The earrings measure around 17mm (0,67") in diameter.

1. String 1 x 11/o cylinder bead and 1 x 11/o seed bead six times, make a knot and pass through the beads, so your thread is exiting from one of the seed beads as shown in the left picture.
2. Pick up 2 x 11o seed beads, skip the cylinder bead and pass through the next 11/o seed bead in the row as shown in the middle picture. Repeat five more times. At the end pass through the first 11/o bead added in this round.
3. Pick up 1 x 11/o seed bead and pass through the three nearest 11/o seed beads as shown in the right picture. Repeat five more times. At the end pass through the first 11/o bead added in this round.


flower stud earrings free pattern

4. Pick up 5 x 15/o seed beads, skip one 11/o bead and pass through the next 11/o bead as shown in the picture (one of the beads strung in step 1).
5. Pass back through the last 15/o bead strung.
6. Pick up 4 x 15/o seed beads and pass through the next 11/o bead added in step 3 as shown in the picture.
7. Repeat steps 4-6 five more times.


8. Pass through the first 3 x 15/o beads added in the previous round.
9. Pick up 1 x 11/o cylinder bead, skip 3 x 15/o beads and pass through the next 3 x 15/o beads as shown in the picture.
10. Pick up 1 x 15/o seed bead and pass through the next 3 x 15/o beads as shown in the picture.
11. Repeat steps 9-10 five more times.


12. Pass through the beads so your thread is exiting from one of the 11/o seed beads strung in step 1.
13. Pick up 1 x 6mm round bead and pass through the 11/o bead on the opposite side as shown in the picture.
14. Pass again through the 6mm bead and the same 11/o bead you have started this round with. You can pass through these beads a few times, so the 6mm bead isn’t sitting too loosely. Don’t worry that the hole of the 6mm bead is visible. We will cover it with beads in the following steps.


15. Pick up 6 x 11/o seed beads and pass again through the 6mm bead forming a loop on one side of the 6mm bead. Repeat one more time, forming another loop on the opposite side, as shown in the left picture.

NOTE: Depending on the exact size of your seed beads (you know that some colours sometimes differ from each other with shape and size, even if they are described as the same size) you might need to add 7 x 11/o beads instead of 6. You have to determine yourself how many beads you will need.

16. Pass through one of the loops as shown in the right picture.
17. Pick up 1 x 11/o seed bead and pass through the other loop.
18. Pick up 1 x 11/o seed beads and pass through the first loop again. Pass through all the beads a few times.


19. Make and secure the knots and trim the remaining thread.
20. Take an ear stud and glue it to the back side of the beadwork.
21. Repeat steps 1-20 for the second piece and enjoy your new flower stud earrings!

CONGRATULATIONS! :)

Author: Justyna Szlęzak, Eridhan Creations
eridhan.blogspot.com


Unauthorized copying and/ or commercial use prohibited
Copyright by Justyna Szlęzak 2013


Saturday, September 7, 2013

Twisted experiment - the second attempt

After playing around with twisted peyote and creating a pendant shown in the previous post, I wanted to try something else, still using this stitch. So I made another pendant (of course!), you probably didn't expect anything else. ;)

It is made with Delica beads, Toho beads, 4mm bicones and a wonderful orange crystal which I got from Marcie. :) It is quite big - it measures almost 7cm (2,75") at the widest point and it looks like this:

twisted peyote beaded pendant

twisted peyote beaded pendant

twisted peyote beaded pendant

twisted peyote beaded pendant

twisted peyote beaded pendant


Now I just want to let you know that I will be away for a few days. Unfortunately, the treatment I'm receiving isn't working at all and my metastases are growing bigger again... I already know that the doctors treating me so far have screwed things up. Guess they thought I wouldn't live for long enough anyway. Well, I have to do something about it so I'm going to see some other doctors, only in the other part of Poland. So I'll be away and I might not respond to your e-mails until I'm back home again.
I'm taking Hope with me. I might need it. :)

See you all soon again! Have a great time until then. :)


Wednesday, September 4, 2013

Twisted experiment

Everyone I know has been making twisted peyote earrings lately. I couldn't be worse then! ;)
Only... I don't wear long earrings! I don't even make them! I make pendants! But I still wanted to try out the twisted peyote... So, I just had to experiment. And honestly, when I started, I didn't even know what result I might achieve. It was supposed to be a surprise even for myself. ;)

Miyuki Delica, Toho beads and two beautiful blue 18mm rivolis have been involved in the process of making the pendant too. So it's not me that has given the pendant its unique look - it's the beads! I like the final effect though. It just looks different from anything I have seen before.

The pendant measures around 3 x 3 x 3,5 cm (1,18 x 1,18 x 1,37"). And this is how it looks like from different angles:


twisted peyote - beaded pendant

twisted peyote - beaded pendant

twisted peyote - beaded pendant

twisted peyote - beaded pendant

It wasn't the only twisted experiment. I have finished the second one already, only still haven't taken any pictures... Maybe tomorrow?
Have a wonderful day and I'll see you some other time then. :)


Monday, September 2, 2013

Orchid - beaded pendant and tiny earrings

A wonderful friend of mine has given me recently the best present a beader can get! When I opened the package and saw lots of Miyuki Delica beads I was speechless! These of you who live in Poland know that well - these beads aren't easily accessible here, so the surprise was even greater for me. Of course, I had to try them out as soon as possible. Actually I wanted to make something simple and since another friend of mine asked why, despite being into astronomy, I haven't been designing anything of star-shape, a star was the first project I decided to make. While beading though it appeared that it would be something more than just a star - not the first time when a finished project is far from what has been planned to make. The result I achieved looks more like an orchid flower to me - don't ask me why though, it's probably just my crazy imagination again that sends such pictures to my brain. ;)

Anyway, this is my first project made with Delica beads (my new greatest love!). Some Toho seed beads are added in the middle. The entire pendant measures around 6 cm (2,36") without the bail.

beaded pendant

beaded pendant

In addition (completely unlike me, I know!) I made some tiny earrings too, repeating the motif from the center of the pendant. Actually they looked so cute to me, that I made another pair too, and soon I will share the pattern here with you. I just need to draw it first. ;) They look better in reality though, much better. The camera has stolen the entire depth and they look so flat here...
They measure around 17mm (0,67") in diameter.

beaded earrings

And tomorrow I'll show you another experiment with Delica beads. An experiment that I have found rather successful. ;)
So see you until then, my friends. :)


Monday, August 19, 2013

Ssssssnakes ;)

When I found a pattern for the snake, I knew I would have to make it. It didn't even look like a beaded crochet rope, more like a real snake. It took some time though to make it - I started working on that necklace in the end of June, and I finished it just two days ago. Of course, if I had been focusing just on this piece, it would have been done long ago. Stringing the beads though was a nightmare, and this is what was stopping me from finishing it sooner. Over 9300 beads, tiny 15/o beads, have been used for this project... And now I am crazy enough to want to make a green one! ;)

The necklace is 40 cm (15,75") long.

snake - beaded crochet necklace

And a close-up:

snake - beaded crochet necklace

Unfortunately, I don't know the author of this amazing pattern. I found the snake here, so if it's you, Kseniya, who has drawn it, it's a great job done!

And as I am posting snakes here, there is one more beaded crochet rope with a snakeskin pattern, although not that realistic, as the first one. This necklace was actually waiting for six months to be finished. Started in January, finished in June. I guess I just had more funny things to do. ;)
It is made with 11/o Toho seed beads and is 42 cm (16,5") long.

snake - beaded crochet necklace

Now, despite my plans on making another snake, I should get some rest from bead crocheting. I have got some wonderful Delica beads lately, so it's about time to try them out. :)

See you soon with some other beadwork. Good night! :)


Saturday, August 17, 2013

The roses again...

It's quite late already, but I better post it now, since I might not have enough time tomorrow...

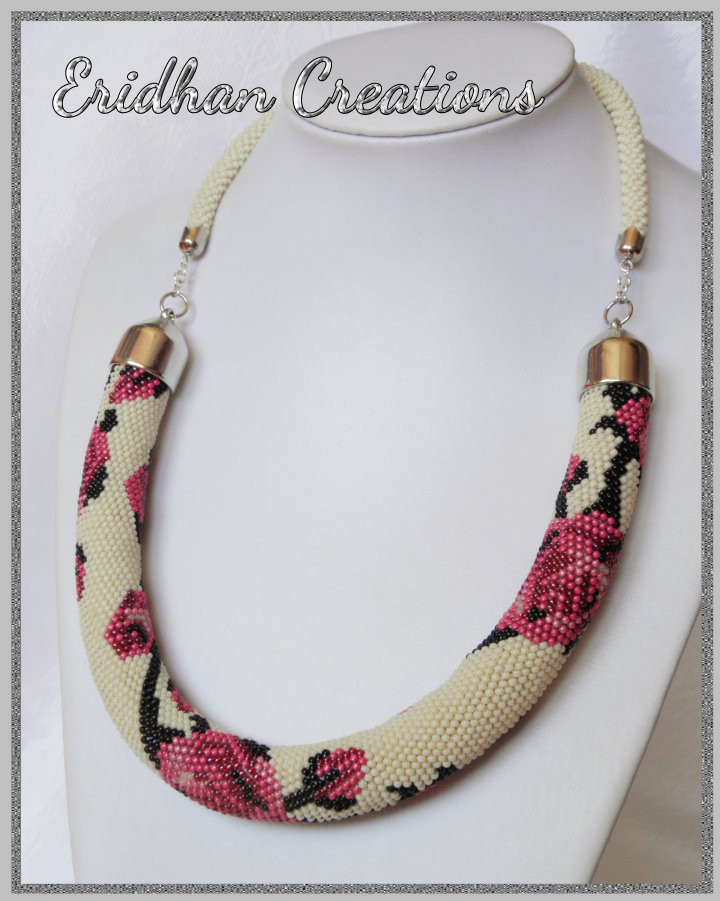
Do you remember the crocheted necklace with the roses? The one from this post? Well, it didn't look bad, but making it was a nightmare. I'd never make it again... but I knew that someone really liked it and wanted to have one for herself. It was hard to force myself to work with this pattern, I admit, but once I realized that I had only a few days left (it had to be done by August 17th - that's today!), I started working like crazy to make sure it would be finished on time. Still don't know how it has happened... but the necklace was completed within just three days. Yayyyy!! ;)

So, this is the necklace again... this time the roses aren't on a white background, but light beige instead. It is made entirely with Toho seed beads size 11.

beaded crochet necklace


I wanted the necklace to have an adjustable length, but adding a chain for that purpose didn't sound like a good idea to me. Not for such a thick rope at least. Below you can see how it has been solved. :)


This is the shortest version:

beaded crochet necklace


This one is slightly longer:

beaded crochet necklace

And this one a little bit longer than slightly longer ;)

beaded crochet necklace

And finally, the longest version.

beaded crochet necklace


During the last few days I have made two more gifts. One of them is another beaded crochet rope, simple but elegant for Julia, along with a matching bracelet.

beaded crochet necklace

beaded crochet bracelet


The second gift is a small, simple pendant for Helene. She probably doesn't expect any gift, so hopefully it will be a nice surprise for her. :)

beaded pendant


And in just a few hours all the gifts will be in a plane flying to Sweden...
I will stay with you though, because soon I'll have more beadwork to show. :)

Good night! :)


Thursday, August 8, 2013

Mandala - beaded pendant

Lentils... Mmm... There were one of my favourite candy when I was a kid. They weren't even available in Poland, so we were getting them always when we went to Czechoslovakia - yep, it was THAT long time ago, when it was still one country. Now you can buy similar candy almost everywhere... but is it just me, or they really don't taste like the true Lentilky? ;)

Now my favourite candy is BEADS! But now you can find lentils even amongst the beads. I got a few colours some time ago, and finally I decided to make some use out of them. This is how the "Mandala" pendant was created. The base is a net made with lentil beads, embellished with seed and fire polished beads. It measures 4cm (1,57") in diameter, and trust me - it was incredibly fast to make. I needed only one hour to complete the second, silver and blue, pendant. It's simple, yet it is quite eye-catching.

The tutorial for the pendant is available on Etsy and Craftsy.

Also, if you would like to get this pattern on Etsy, use a following coupon code: LENTILKY - and it will give you 10% discount - not only for the Mandala pattern, but any other tutorial too. :)
It expires on August 12th, so you have some time to use it. :)

beaded pendant pattern

beaded pendant pattern

beaded pendant tutorial


And as always, I want to thank you for visiting this blog. You make me want to create even more. :)
Hugs to all of you! :)


Related Posts Plugin for WordPress, Blogger...