Monday, May 19, 2014

Finally! Tutorial for the "Polaris" pendant is finished! :)

At first let me apologize that you had to wait for it quite a long time... There were a few things though that didn't leave any time at all for me to do some beading. I knew that some of you could hardly wait for it, and I must admit it was quite motivating. :) So thank you for your patience and I hope you will like the tutorial.

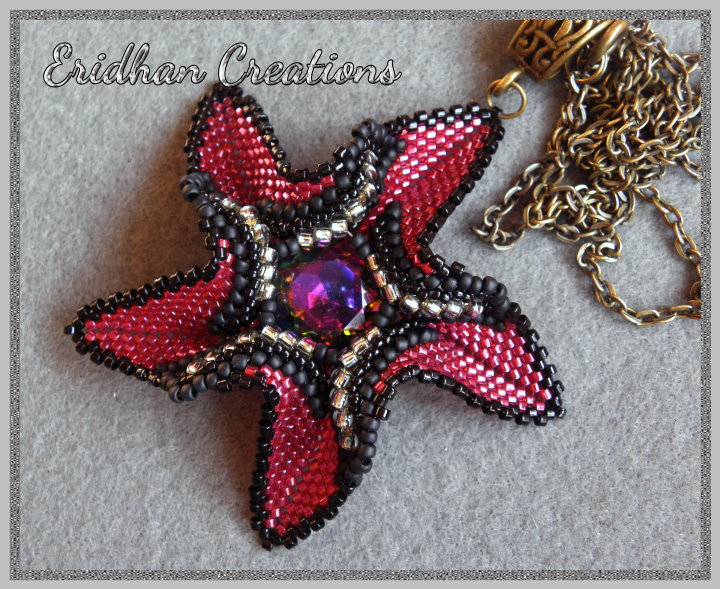
I named the pendant "Polaris", because most of you could see a star in it. :) It isn't very difficult, not more than the rest of my twisted peyote patterns. But passing through the beads in the final rows can be more than challenging! Pliers were a must for me this time, so you might consider using them too - otherwise it can be really hard to hold the needle at some points. I would suggest trying to make the other twisted pendants before attempting at this one really. If you are already familiar with these twists, it is much, much easier.

This version of "Polaris" is made with Delica beads, and as they are slightly smaller than Toho Treasure, the entire pendant is a bit smaller too. By the way, it was the first time when I made something with galvanized Delica (#462, so not duracoat) and I was a bit afraid that the color might rub off. To my greatest surprise it survived all the twisting, turning, distorting and all the other torture the beadwork has gone through. That was a nice surprise then. :)

So, here you can see the pendant, and here you can find the tutorial. Enjoy! :)

twisted peyote pendant - tutorial

twisted peyote pendant - tutorial

twisted peyote pendant - pattern

twisted peyote pendant - pattern


Have a great day and I'll see you soon again. :)


Tuesday, April 29, 2014

More experimental twisting

Did I say that I love the twisted peyote more and more? That's a stitch that gives a thousand of possibilities! One idea leads to another one, and when I was making the square from the last post, such a new idea appeared in my head. I just had to try it out as soon as possible! Of course I had no idea about the final result in the beginning, but along with the growing number of beads I knew what I was going to achieve. Whether it was a successful experiment or not, only you can probably tell. I like it though, as it looks different from anything I have made so far - despite using the same stitch as in the last few pieces.

The pendant is made with Toho Tresure and round seed beads, with a big 18mm rivoli in the middle. It's not a small piece, not small at all, as it is almost 8cm (3,14") wide and long (without the bail). I haven't got any pattern for it yet - but could be that it will be ready by the end of this week. :)

So, is it a cross? Or maybe a four-pointed star? Can't decide what it resembles to me. I wonder what you can see in this pendant then. ;)

twisted peyote beaded pendant

twisted peyote beaded pendant

twisted peyote beaded pendant


So, until the next time! :)


Sunday, April 27, 2014

Windmill - or Twisted Square - another twisted pattern :)

I can't believe I have finished it...

Of all my twisted peyote pendants, this one appeared to be a nightmare. First I have chosen wrong Delica beads, with extremely thin walls, breaking more than easily. I had to go back a few rows three times (!) just to remove a half of a broken bead and replace it with a new one. Then I lost one of the bicone crystals and since I didn't have more than 12 beads of this colour in my stash, I had to replace them all. I truly hated this pendant long before I have finished it. Yet, somehow, it is finally done. :)

A similar pendant you could see in this post. This time I used a different cabochon - 14mm rivoli, so it made the entire piece look a little bit different. It's actually nice to see that you can achieve different results with exactly the same pattern.

Just as the rest of the twisted designs it is made with cylinder beads and seed beads in sizes 11/o, 15/o and 8/o. In addition, there are twelve 4mm bicone crystals woven in the edges. It measures 7cm (2.8") at the widest point.

And the pattern is traditionally available here on Etsy. :)

twisted peyote beaded pendant

twisted peyote beaded pendant

twisted peyote beaded pendant

twisted peyote beaded pendant

twisted peyote beaded pendant


Have a nice Sunday, everyone! :)


Tuesday, April 22, 2014

Rosetta - just another beaded pendant :)

While working on a tutorial for a Twisted Square, which should be ready in a couple of days, I completely forgot that I have finished another pattern in the meantime.  Rosetta is my first trial with two-hole Piggy beads. Actually, even three trials as you can see below... And I'm not quite sure if I like these beads very much. It's not that they are bad... not at all! But if they were a little bit smaller, they would be perfect! I'm sure though that it's not the last time I used them in my beadwork. This pendant is a very simple one, so hopefully I will be able to use them in something a bit more complicated. ;)

The pendant measures 4,5 cm (1.77") without the bail and it is made, except of Piggy, with 8mm round beads and seed beads in two sizes. The tutorial is available here on Etsy.

And these are the three colour versions. I think I like the blue one the most. :)

beaded pendant "Rosetta" - tutorial

beaded pendant "Rosetta" - tutorial

beaded pendant "Rosetta" - tutorial

beaded pendant "Rosetta" - tutorial


Take care, hugs to all of you, and I'll see you again soon! :)


Monday, April 7, 2014

Another twisted triangle

Guess what? Despite my laziness I managed to finish the tutorial for the twisted triangle! You could see the design here before, but when I was making it for the second time, I decided to change one thing. Don't know about you, but for me the new version looks a bit better. :)

I used Toho Treasure again - gold lined aqua - and I must say that I didn't expect them to look so good in a beadwork. Depending on the light they look like a cold steel or they have a warmer, yellowish tint. Worked good with some antique bronze seed beads, I think.

The triangle measures 6,5 cm (2.5") at the widest point.

The tutorial is available here on Etsy.

Now I have to go back to work... I promised to prepare the tutorial for the twisted square too...
Have to keep my promise, you know! ;)
So I'll see you some other time. Have a wonderful day! :)

twisted triangle pendant pattern

twisted triangle pendant pattern

twisted triangle pendant pattern

twisted triangle pendant pattern


Friday, April 4, 2014

Twisted Star - again :)

The series of twisted patterns is not over yet. The instruction how to make the flower from the previous post not only is already available here on Etsy, but it is also accompanied by the tutorial for the twisted star. You could see one on this blog already, today I can show you another one.

This one is a little bit (two rows) smaller than the blue star, with a black edge that makes it look even smaller. This time I made it with Toho Treasure beads in one of my favourite color - Gold Lustered Raspberry. There's a beautiful square crystal in the middle (thank you Marcie, it is truly gorgeous!).

The pendant measures 6,5 cm (2.5") at the widest point and the pattern can be found here.

Please remember that I don't recommend any of these patterns for beginners. You should really be familiar with peyote stitch in order to make it. But if you want a challenge, well I won't stop you anyway. ;)

Hopefully I'll be able to prepare the rest of the promised tutorials for a twisted square and a triangle soon. I'll do my best. :)
And until then, take care, all of you! :)

twisted peyote star pendant


Tuesday, April 1, 2014

Twisted flower

After a few bracelets it's about time for more pendants. And for more twisted designs, as it has been a while since I have shown the last one. :)

This time it is a twisted flower - or at least something that looks like a flower to me. Traditionally made with Delica beads and seed beads in three different sizes, with a glass pearl in the center. It is quite big, because it measures something like 6,5cm (2.5") at the widest point.

The good news is that the tutorial for this pendant is ready. :) I just need to test it before I can publish it, so you'll probably see another twisted flower soon. And I am really happy to announce that June Huber, the master of twisted peyote, has given me a written permission to publish the tutorials for these of my designs, which are based on her idea of combining the beads in certain order to achieve the twisted effect. Thank you, June! :)

So here's the pendant... and I'll see you soon again.
Have a great day! :)


twisted peyote flower pendant

twisted peyote flower pendant

twisted peyote flower pendant


Edit: This tutorial is already available here. :)


Thursday, March 27, 2014

"Geometrica" - another beaded bracelet

It's hard to believe, but I realized that I have made more bracelets than pendants recently. Since I wear them only when it is warm, it must be the obvious sign that my beading mind is slowly switching to the spring mode. ;)

Another bracelet pattern is called "Geometrica" and it calls for 6mm CzechMate Tiles, SuperDuos, 3mm fire polished beads and seed beads in two sizes. I must say that in the beginning I wasn't very happy with this design, without any actual reason. Just didn't like it much. But I decided to give it another chance and made a second bracelet - turquoise tiles and bronze SuperDuos did the trick! Suddenly I started loving this pattern - and there are three sets of beads on my desk at the moment waiting to turn into these bracelets. I was just waiting for some black tiles, which arrived just today, so hopefully I'll be able to show you some more versions of this pattern.

You don't have to wait for me though if you want to see the bracelet in some other colour variations. Just make your own - as the tutorial is available here in my store on Etsy. ;)

The bracelet is 1,8 cm (0.7") wide and this is how it looks like:

beaded bracelet pattern

beaded bracelet pattern

beaded bracelet tutorial

beaded bracelet tutorial

Yep, the white&blue one was the bracelet I didn't really like. But later I thought that I have made worse things before, so I can show it to you anyway. ;) I still like the bronze version better. Much better. ;)

Thank you for visiting the blog, all your kind words and your support in general. Lots of hugs to all of you! :)


Wednesday, March 26, 2014

Simplicity - beaded bracelet - free pattern! :)

Just as I promised yesterday, I've got for you the free tutorial for a beaded bracelet. "Simplicity" is yours now. ;)


You will need:
6mm round beads
SuperDuo beads
4mm fire polished beads
8/o seed beads (2 pcs)
11/o seed beads
Your favourite beading thread
Beading needle size 10
2 x metal jump rings (optional)
A clasp of your choice
This tutorial ;)


The exact number of beads depends on your individual desired length. For a 15cm (6") long bracelet (without the clasp) I needed 15 x 6mm beads.


The bracelet is 2,5 cm (1") wide.


1. String 1 x 6mm round bead and 1 x 8/o seed bead. Pass back through the 6mm bead as shown in the left picture.
2. String 1 x 11/o seed bead, 3 x SuperDuo beads, 1 x 11/o seed bead and pass again through the 6mm round bead. Repeat the entire step one more time, so your beadwork looks like in the right picture..

3. String 1 x 4mm fire polished bead and 1 x 6mm round bead.
4. Repeat step 2 for the current 6mm bead.
5. Repeat steps 3-4 until you have reached the desired length of the bracelet.
6. Pick up 1 x 8/o seed bead, pass back through the 6mm bead, then pass through the beads so your thread is exiting from the just added 8/o bead.
7. Pick up 2 x 11/o seed beads and pass through the upper hole of the nearest SuperDuo as shown in the picture.
8. Pick up 1 x SuperDuo and pass through the upper hole of the next SuperDuo from the previous round. Repeat one more time.
9. Pass through the upper hole of the nearest SuperDuo as shown in the picture.
10. Repeat steps 8-9, ending with step 8, until you have reached the end of the bracelet.
11. Pick up 2 x 11/o seed beads and pass through the 8/o seed bead.
12. Repeat steps 7-11 on the other edge of the bracelet as shown in the picture. At the end pass through the first 2 x 11/o seed beads added in this round.

13. Pick up 3 x 11/o seed beads and pass through the upper hole of the nearest SuperDuo added in the previous round, as shown in the picture.
14. Pick up 1 x 4mm fire polished bead and pass through the upper hole of the next SuperDuo bead.
15. Pick up 1 x 11/o seed beads and pass through the upper hole of the nearest SuperDuo as shown in the picture.
16. Repeat steps 14-15, ending with step 14, until you have reached the end of the bracelet.
17. Pick up 3 x 11/o seed beads and pass through the 2 x 11/o seed beads, 1 x 8/o bead, 2 x 11/o beads as shown in the picture.
18. Repeat steps 13-17 on the other edge of the bracelet. At the end pass through the first 3 x 11/o beads added in this round.

19. Pick up 3 x 11/o seed beads and pass through the nearest 4mm fire polished bead.
20. Pick up 4 x 11/o seed beads and pass through the next 4mm fire polished bead.
21. Repeat step 20 until you have reached the end of the bracelet.
22. Pick up 3 x 11/o seed beads and pass through 5 x 11/o seed beads, 1 x 8/o bead, 5 x 11/o beads as shown in the picture.
23. Repeat steps 19-22 on the other edge of the bracelet.

24. Insert a jump ring inside the 8/o beads on both sides of the bracelet or make beaded loops, attach a clasp, make and secure the knots, trim the remaining thread and enjoy your new beaded bracelet.
CONGRATULATIONS! :)

And one more thing for the end... I hope you enjoyed making this bracelet and the tutorial was helpful for you. I will be happy to receive some feedback, and if you have any suggestions what should be changed in this tutorial, feel free to contact me. If you are going to show this bracelet on your blog or any other website, please give me a credit for being the author of this pattern.

Happy beading!


Author: Justyna Szlęzak, Eridhan Creations
eridhan.blogspot.com
Unauthorized copying and/ or commercial use prohibited
Copyright by Justyna Szlęzak 2014


--------------------------------------------------------------------------------
The printer friendly pdf file with the whole instruction is available here on Etsy.

Disclaimer: Please do not sell the items you made from the free tutorials. If you want to sell the items, please purchase the pdf files I offer on Craftsy and Etsy - that gives you the right for selling your creations. Thank you.

Tuesday, March 25, 2014

Simplicity - beaded bracelet

Since I have no excuse anymore to stay away from the blog, I would like to show you another bracelet. Yes, a bracelet, not a pendant, for once! ;) Even a few bracelets, since the pattern was so nice, easy, fast and simple to make. True Simplicity indeed. ;)

You will need some 6mm round beads, SuperDuos (lots of them!), 4mm fire polished beads and 11/o seed beads. The full tutorial however will be published tomorrow. I still have an illustration or two to finish by now.

The bracelets are 2,5 cm (1") wide. And this is how they look like:


beaded bracelet free pattern

beaded bracelet free pattern

beaded bracelet free pattern

beaded bracelet free pattern

Remember, the free tutorial will be available soon. So stay tuned!. ;)

Until then, my friends. :)


Sunday, March 23, 2014

Sea Urchin - tutorial - and other water creatures ;)

I know, I know, I wasn't here for a long time again. This time though it wasn't just because of my laziness. ;) I was working pretty hard, restarting my 240l aquarium, which got quite neglected during my treatment last year. It didn't look good at all anymore so I just had to do something about it. It took quite a long time - I had to move the fishes to a small tank where they could live for more than a week, clean something like 70 kilos of gravel, prepare a huge amount of water, deal with two buckets of water plants, then wait until I could move the fishes to their old home again...  I still have to keep in check all the water parameters if I don't want any algae to appear, until the aquarium becomes fully stabilized, but now it is quite pleasant to look at it again. ;)

I have done a little bit of beading since my last post though. The Sea Urchin pendant is one of the pieces that some of you  have seen already (and some of you have even made it from my tutorial). ;) I guess it is time to show it finally on my blog too. It is made with 13mm spikes, SuperDuos, fire polished beads and seed beads. Not so difficult to make, I can assure you. It measures around 4,5 cm (1,77") in diameter, without the bail.

The tutorial is available here on Etsy. If you want the Polish version I would suggest waiting for the summer issue of Beading Polska magazine. :)

Here you can see two different colour versions:

Sea Urchin - beaded pendant tutorial

Sea Urchin - beaded pendant tutorial

Sea Urchin - beaded pendant tutorial

Sea Urchin - beaded pendant tutorial


But make sure to visit Silke's blog too! She made a really beautiful, blue version of the pendant!

Before I say good bye for now, I'll show you some pictures of my private underwater world too. These are different views of my aquarium, when it still looked good. The current layout can't be shown until all the plants will grow some more. ;)
So, enjoy and see you soon! :)

planted aquarium - 240l

planted aquarium - 240l

planted aquarium - 240l

planted aquarium - 240l

planted aquarium - 240l


Related Posts Plugin for WordPress, Blogger...